You have setup WordPress and installed WordPress cache plugins to improve your site performance. That's great!
But, many of the WordPress users keep complaining about page or blog updates not showing instantly on their blog. It’s annoying to see old content after changing something on your WordPress. Isn’t it?
The common reasons for this behavior include your web browser cache, web server cache and WordPress cache plugins.
In this guide, we’ll show you how to to clear WordPress cache so that you can see changes immediately.
What is WordPress cache?
Many WordPress sites uses cache plugins such as WP Super Cache or W3 Total cache to improve performance of WordPress.
These caching solutions generates static html files from dynamic WordPress blog. Once a html file generated your webserver will serve these files instead of compiling PHP scripts again and again.
So, WordPress cache plugins boosts your site page speeds and enhances web server performance too.
However, sometimes this caching causes you to not see updates right after you make changes to your blog. You have to clear WordPress cache manually through plugins to see any changes.
On that note, let’s see how to clear cache through the most popular cache plugins.
Clear WordPress cache on WP Super Cache
WP Super Cache is one of the most widely used caching plugins by WordPress web sites. You can follow below steps to clear cache manually if you are using this plugin.
Step 1: Login to WordPress Administration Dashboard.
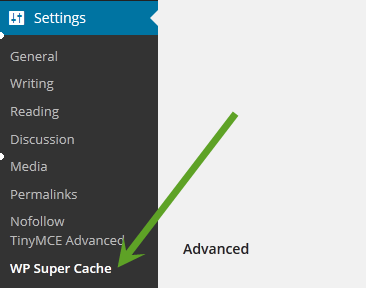
Step 2: Go to Settings and click WP Super Cache as shown in the image.

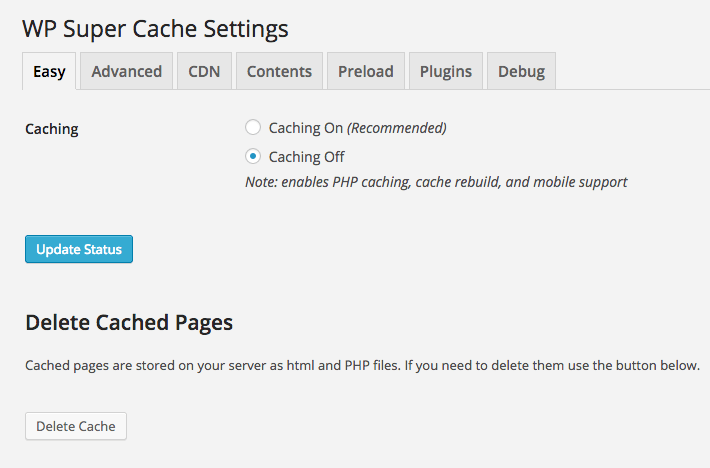
Step 3: Then, click Delete Cache button on WP Super Cache settings page.

That’s all, you have cleared cache but you might have to refresh your website in browser to see changes.
Clearing cache on W3 Total Cache Plugin
W3 Total Cache is a very popular among advanced WordPress users due to its customization and advanced features. Many popular companies like AT&T, mattcutts.com, mashable.com, css-tricks uses W3 Total Cache plugin.
Let’s show you how to clear cache on W3 Total Cache.
Step 1: Login to WordPress Administration Dashboard
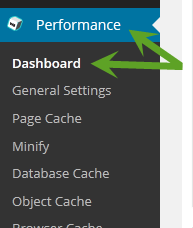
Step 2: Click on Performance and then, click Dashboard button

Step 3: Click on empty all caches button to delete all cached data.

That’s it! By following above steps you can clear WordPress cache generated by W3 Total Cache.
Conclusion
When you are using any WordPress cache plugins, sometimes you need to clear cache manually. The above tutorial steps will come in handy.
Once you clear your WordPress cache, you should see any changes you published to your blog. Keep in mind that, the cache plugin will start caching your WordPress again until you disable it.
We recommend you to not use cache plugins when your WordPress based site or blog is still under development.
If you like this tutorial, drop in your feedback in the comment box.
